
Every time a new technology pops up, I try to think of a simple project that I can use it for. This time the technology is chatbots. It took me a good Sunday afternoon to set one up. In this post, I’ll take you through my process and you’ll learn how to create a basic chatbot with API.ai and add it to a Facebook page.
Picking a subject for your chatbot
I advise you to come up with an idea for your bot. It will make building it both easier and more fun. For my project, I chose the topic Rubber Duck Debugging:
In software engineering, rubber duck debugging or rubber ducking is a method of debugging code. The name is a reference to a story in the book The Pragmatic Programmer in which a programmer would carry around a rubber duck and debug their code by forcing themselves to explain it, line-by-line, to the duck.
As you might guess, rubber duck debugging is an easy concept for a bot. All the bot has to do is open up to a problem, and make sure the user keeps explaining their problem. By rubber ducking a problem, a programmer will often find a solution by just talking about the problem. So besides being easy to build, it could actually be useful for its users.
You’ll also need a Facebook page to add your bot to. Either use an existing one or create a new one (which I did for my rubber duck bot). Having one will save you the hassle of creating one later on.
Creating your chatbot in API.ai
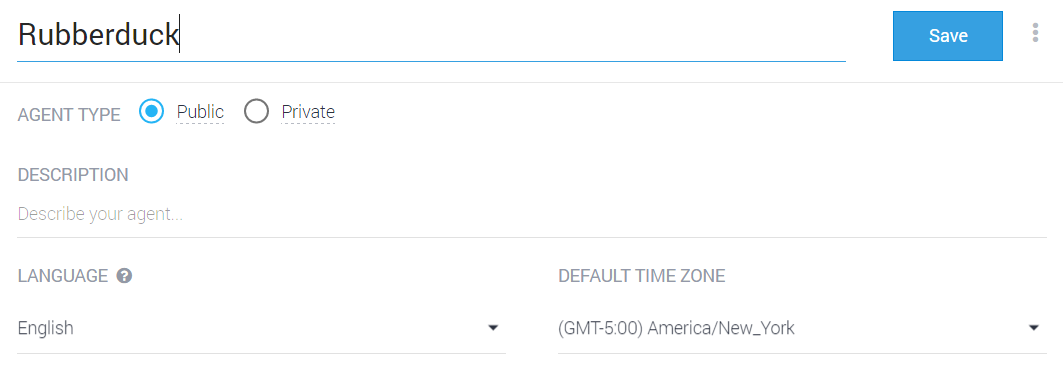
The first step is to create an account on API.ai. After that, it’s time to start creating your bot. The first step is obvious, you create your bot and select a language (they support one per bot):
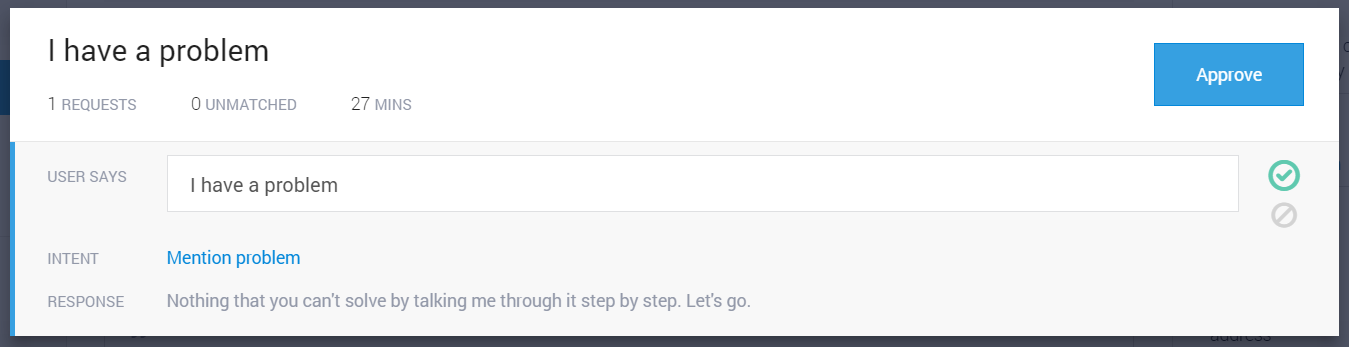
After that, you can start with the fun part: adding intents. Intents are possible intentions of users that your bot needs to react to. My rubber duck bot initially had three:
- Mention problem (the start).
- Problem solved (the end).
- Capture everything in between (fallback).
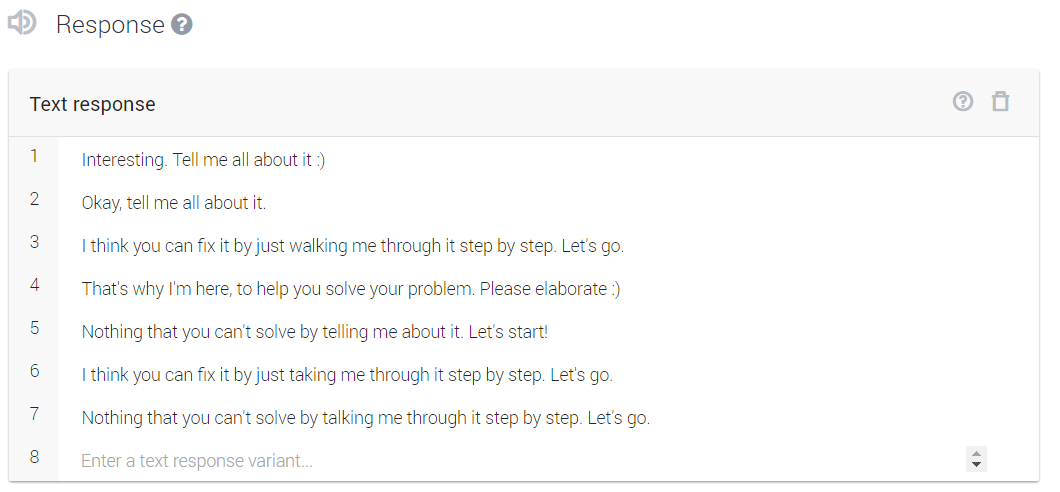
For each intention, you’ll put in the possible words a user can use. For my ‘Mention problem’ intention, I had the following possible phrases:

You’ll also have to list a set of replies for your bot:
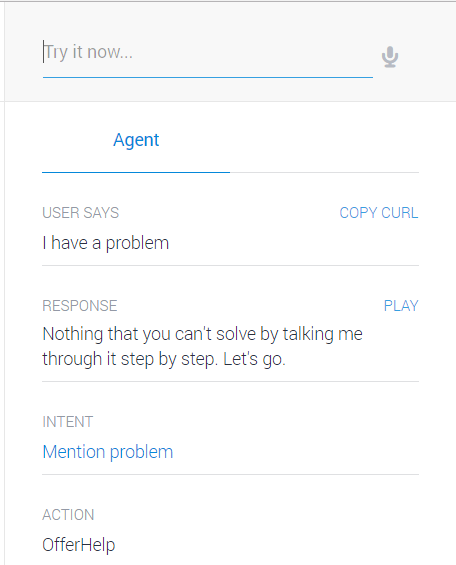
When you’ve done this, you can test your bot on the right side of your screen:
After I set this up for my three main intentions, I felt pretty confident about the limited setup. It was enough for the simple purpose of my rubber duck bot. I continued on to the next step: adding it to a Facebook page.
Adding your chatbot to a Facebook page
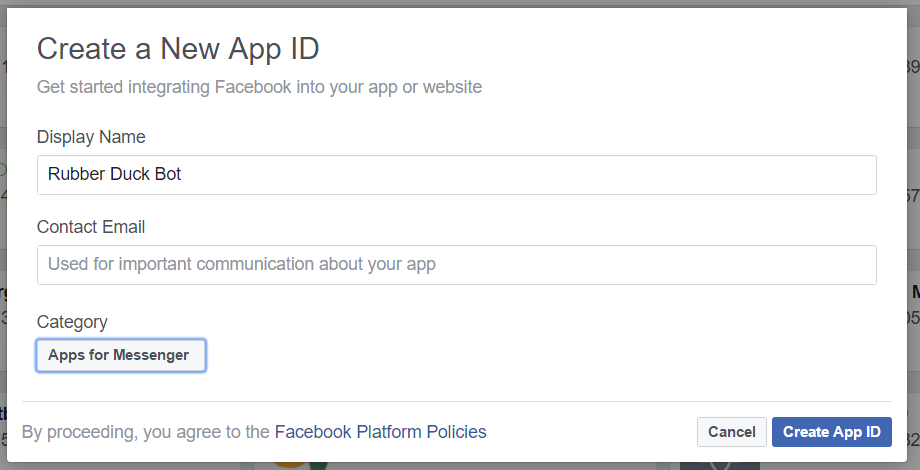
To add your chatbot to a Facebook page you’ll have to create an app on developers.facebook.com . Name the app and select the Apps for Messenger category (this selects the right presets for your app):
After that, you’ll have to connect the bot from API.ai to your Facebook app. Don’t worry. It’s easy and only takes three steps.
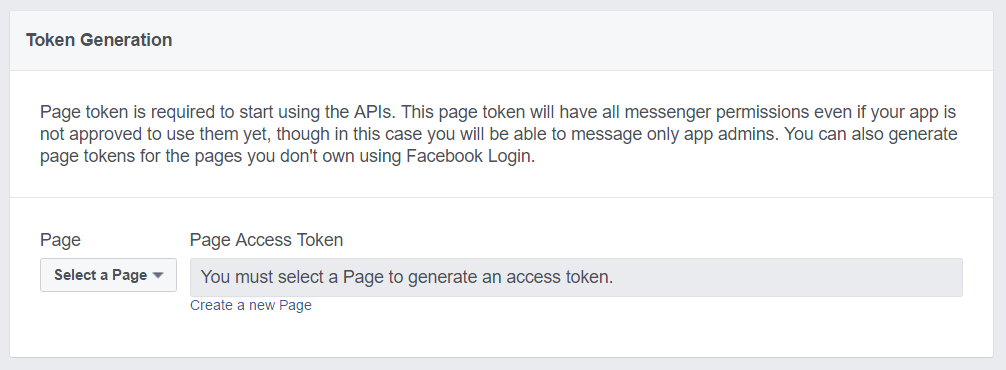
1 Get your page access token from Facebook.
On Facebook, scroll to the Token Generation and select the page you want to connect your chatbot to. This will generate the token.
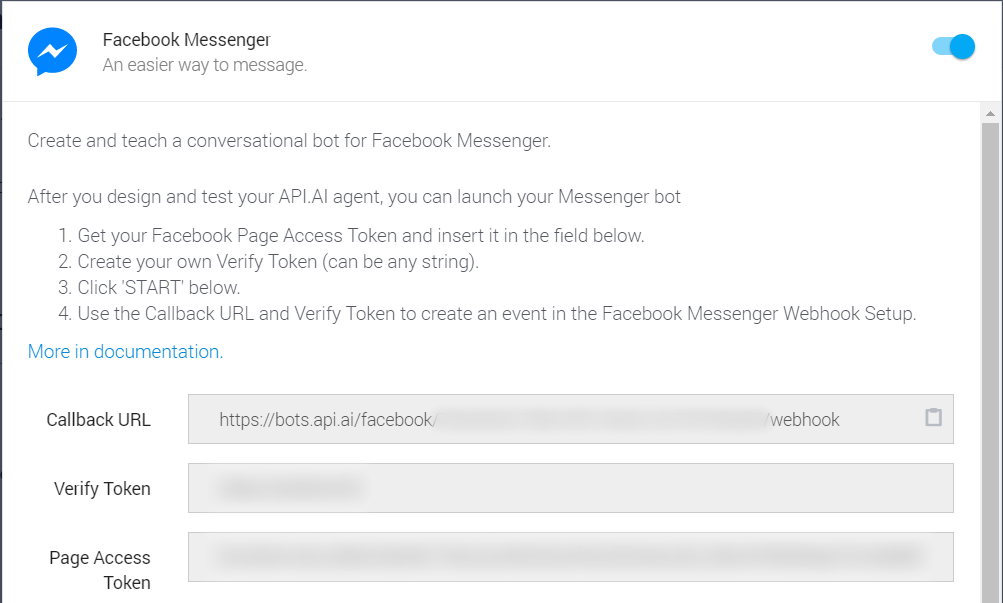
After this, go to API.ai, select integrations and enable the Facebook Messenger integration. You can fill out the access token in the bottom input field.
The access token connects the chatbot (from API.ai) to your Facebook page. It allows it to send replies as the page.
2 Implement the callback URL from API.ai on Facebook.
On API.ai, in the same window where you fill out the access token, you’ll find the Callback URL in the upper input field. Copy it.
Go to Facebook and fill it out under the webhook settings (a bit below the access token of step 1).
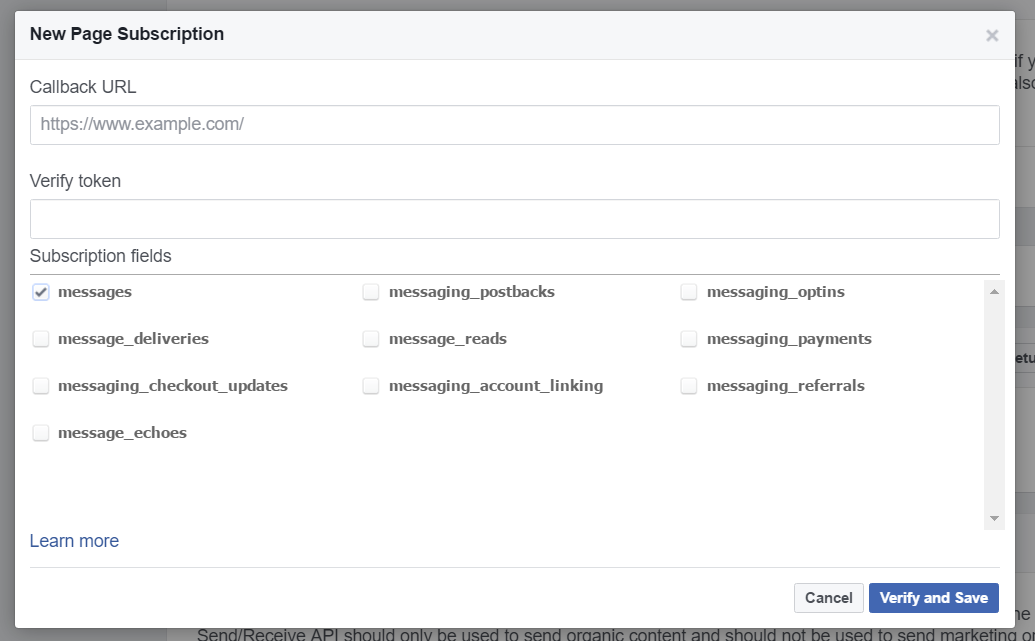
The webhook will send the input of Facebook Messenger to API.ai so your bot can respond to it.
3 Fill out a verify token on Facebook.
The verify token is a value that you can set yourself. It should be the same value on both API.ai and Facebook. On API.ai, fill it out in the second input field under the integration window under the Messenger integration.
On Facebook, fill out the same value under the webhook configuration
If you fill out this information, you can start using your chatbot privately by accessing the Facebook page you connected it to with the same account that you used to create both the page and the chatbot in Facebook apps. To get other users to enjoy your chatbot, you’ll need to have it reviewed by Facebook.
Having your chatbot reviewed by Facebook
To submit your app for review, you’ll need two things:
- an image (1024×1024); and
- a privacy policy.
The image is easy. And don’t worry too much about the privacy statement, this is the one I use for Rubber Duck Bot. It only lists links to both Facebook Messenger’s and API.ai’s statements, and it got through.
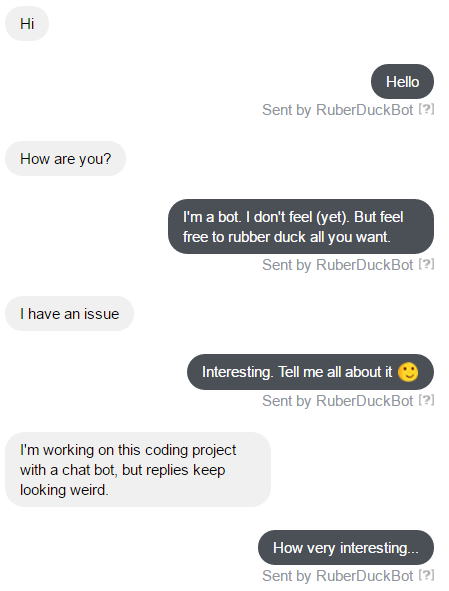
After this, the fun part begins. When you submit your app for review, you’ll see one or two of Facebook’s testers use your Messenger bot. Actual people chatting with your chatbot! Sadly, this is where I saw things go wrong:
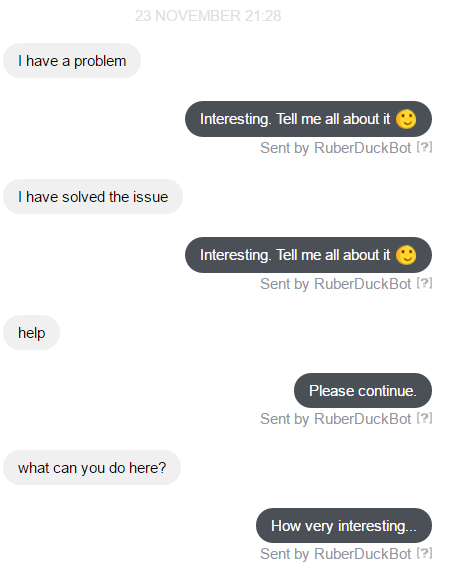
This is what you call an awkward conversation. Unsurprisingly, it didn’t pass the review. The good thing is that I could clearly see why. I decided to tweak some of my intents and add some extras:
- Greetings.
- Tutorial (what can I do here?)
- Farewell.
- How are you?
With these intentions added, I resubmitted it for review, and this time the conversation with Facebook’s testers looked a lot better.
And most importantly, it got through! Booyah! My chatbot was now public.
Training your bot
As soon as the chatbot went public, I invited friends and colleagues to the Facebook page. And sure enough, things didn’t go that smoothly. Again. The good thing is that you can train your chatbot on API.ai. You can review conversations and mark wich replies were correct and wich ones weren’t:
You can correct the incorrect ones to the right intent and save it. Both the correct and corrected ones are added to your intents as soon as you hit the approve button. This is how you make it learn from actual conversations.
Current state of Rubber Duck Bot
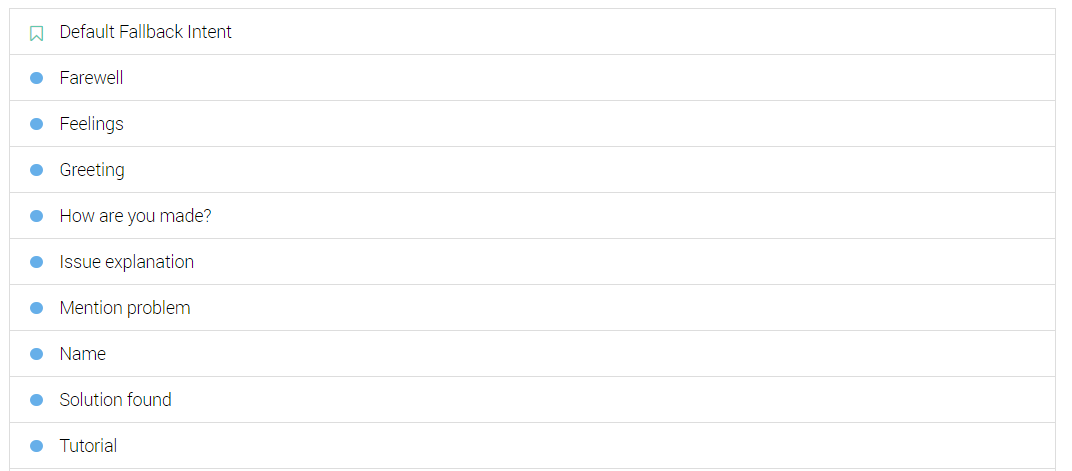
Rubber Duck Bot currently has 10 general intentions:
The bot has had conversations with 25 users. Some went well, and some didn’t. I did train it with each conversation, though I didn’t really see the effects of training it yet (probably because the different inputs have been too unique, or the number of conversations is still too small, or both).
The tip of the iceberg
It’s good to know that I’ve just touched the tip of the iceberg regarding chatbot possibilities in this tutorial. API.ai also supports entities, parameters that your bot can recognise and ask for (e.g. toppings on Pizza). If you’d have a Pizza ordering bot, you can set the required information for an order as entities. As long as the chatbot misses information, e.g. toppings, it’ll keep asking for it untill it has a complete set of information for the order.
API.ai also supports way more integrations such as Slack, Twitter and Telegram.
For now, I’ll keep on training my lovely little Rubber Duck Bot to see how it develops. If you ever need a digital rubber duck, you can find it here: